Tuesday, July 27, 2010

Garden Biz-ness

I took a bunch of photos a little over a month ago and just never got them posted - busy with a lot of things - getting ready for Market and so on.

So here is a photo essay on what is going on in the back yard as of June 30th.


Entering Plantman Gardens


Evening Primrose, Thymes, Virginia Creeper, Lily of the Valley, Phlox etc.


Astilbes - Lots of them!


More Astilbes (there are Snowdrift, Fanal, Etna, Delft Lace, Finale, Catelaya, Gloria and more!)
 as well as cannas, sedums and lots of others.


Here are some purple coneflowers started from seed and a few different plants.


Three types of perennial geraniums - Patricia, Sanguinium and Brookside


Monkshood, cherry bells, bee balm, yarrow, asters - just before coming into flower.


Coral Bells, Iris, columbine and red Honeysuckle


Irises - Variegated, Purple Bearded and Yellow and purple bearded


Hostas - Undulata Marginata, Francee, Wide Brim, Blue Cadet, Sum and Substance


Daylilies - Elegant Candy, Pandora's Box, Mini Stella and Black Eyed Stella


Asiatic and Oriental lilies - not in bloom at the moment, but it's coming!


Ornamental grasses and Giant Striped Reed.


We've kept a few things aside for our own gardens, but everything above will be available for purchase.  Bloom time will be AMAZING!


I also discovered the closeup or Macro setting on my camera and took these pictures on the same day:

This is an Etna astilbe flower spike.


Here is a closeup of an astilbe flower spike.


Red Bleeding Heart closeup.

and White Bleeding Heart.


Dwarf Red Bleeding Heart


Columbine - just gorgeous!


Chocolate Mint; see the dark margin around the leaves?


I planted these last year and didn't expect them to come up this spring because they are in a container.  But they did!  It makes me smile just to look at them in all their lovely colour.  :-)


This is lamium.  The flowers vary from deep purple to light pink to white.  We have several different ones and this is one that Steve planted in the garden in front of the house last year.  They look delicate but are obviously very hardy.


This is one of the perennial geraniums - called Patricia

and the blue one below is called Brookside.


This is White Creeping Thyme.  It is lovely when it blooms.  It's a great ground cover for rock gardens or between stepping stones.  We also have wooly thyme and Minas Thyme; the blossoms are different colours for each type.


This is a Black Eyed Stella Daylily.  Don't know why it's called that because there doesn't seem to be a lot of black on it.


Below is a Hosta Undulata Marginata with a flower spike just forming a bud.


This is an evening primrose blossom - what lovely clear yellow!


This is Virginia Creeper.  Steve tells me that there will not be any flowers, only berries, and so the berries are already starting to grow.


And last but not least by far is the white honeysuckle.  It had many flowers on it, and this was the first time I had ever seen one.  It's lovely!  It will climb, and though there is a trellis there now, we'll replace it with a better one once the honeysuckle is a little bigger.  this is on the side of the house.


As always, if you click on a picture, you'll get a much bigger version.  To return to the blog, just hit the back button.  I hope you enjoy these photos as much as I enjoyed taking them.  :-)

Monday, June 28, 2010

My Mad Lab...er...Workshop! Yeah, that's it - My Workshop! :-)

I promised some people I would post some pictures of my workshop.  I suppose it's difficult to imagine just where in my small house I could find enough space to work, let alone store all my stuff - and yes, I have a lot of "stuff".  Well, I manage, though it seems like the space is already full, I somehow manage to fit more "stuff" in.

So here goes!

To get to the basement, I go down a narrow set of open stairs from the kitchen.  The basement is uninsulated with a concrete floor and concrete walls.  There are 4 windows, two on each side wall, and an exit onto the back yard with a shorter and much wider set of stairs.  The following pictures were taken at night, so bear that in mind as you look at them.  The windows are the new ones I put in in the fall, so now all the windows in the house have been replaced from the original and, of course, make the house that much more cozy.

At the bottom of the stairs from the kitchen is where my soap cures.  I keep each batch in its own plastic shoebox (that has holes for air circulation).  You can also see some of the finished bath and body products that are waiting to be sold.


On the bottom middle shelf above are my liquid oils - Olive, Castor, Canola, Avocado etc.  On the bottom right are my cocoa butter and shea butter and salts etc.  Kitty Litter buckets come in really handy!


Next photo is a little closer picture of the same area - gives you a little better look at what is there.


Here's my workbench - every mad lab...er...Workshop should have one!  I put a new top on the bench that was already there because that one was made of tongue and groove boards that were old, and uneven and unlevel.  This works MUCH better!  There are about 5 coats of polyurethane on it, and as long as I make sure to wipe it clean anytime I spill stuff on it (notably lye) it should stand the test of time.
The plastic bins under the bench hold other supplies, and the bins on the bottom, resting on the floor hold the wax for my candles.  I had some better task lighting installed in the form of three four foot long fluorescent light fixtures (one is above the workbench, of course), added some more outlets and put in an outlet bar.  Some things I don't have to have plugged in all the time, but some I do, and this arrangement works quite well.

In this next photo you can see the workbench plus the shelving beside it.  That shelf unit holds my microwave (which I use for melting things like butters and oils and beeswax for balms and solid lotion sticks), the stereo (yes, Sean, that's your old one!!), pots, pans, utensils and on the bottom are my hard oils like palm and coconut and other stuff (like my lye buckets).


Because the walls are concrete, it's difficult to mount shelves, so I've had to use standalone shelving units.  The ones I have are very versatile and luckily for me, 
go on sale at Canadian Tire every so often.  I'm thinking I might need another one for the area around the corner from this unit.  We'll see.


This photo shows my drawer units that have things like bags, small equipment, candle moulds, wicks, wax additives and so on.  I don't know what I'd do without them. 


I use all the space I can - note the baskets hanging from the floor joists.  They each contain something different; for example the one on the right contains soap ends that I sell by the ounce at the Market.  There are LOTS of nails in those joists so I do hang stuff from there when I can.  I tell ya, I DO use everything I can.  :-D

 A real bonus in my basement is the water hookup for a sink.  There was a sink there, just not one that was particularly efficient for my use.  So when the plumber was here fixing the items the insurance company wanted corrected, I had him replace the sink with a proper laundry tub and faucet. This is MUCH better because now I can wash my soap pot and utensils a lot easier.  This is where the second fluorescent light fixture is (so I can see to make sure the pots are clean, of course).  You can also see the door to the backyard.  Steve is going to build better shelves in this area for our tools, as well as a counter area for my dish drainer.  Whoo Hoo!

Here is where I label and package my products.  I love this folding table because it is strong and sturdy - in fact if I could find another like it I'd be a happy camper.  However it seems this style is no longer being made, so any one I find will likely be a second hand one.  The third fluorescent light fixture is above this table, in among the duct work.  The extra light is fantastic - and a less exhausting for the eyes.


Here are the finished candles and the soap labelled and ready for sale.

At the top of the picture on the right you can see the duct going from the furnace to the kitchen - it's very low.  I've hit my head on it numerous times and it's why I don't do any "work" in that area of the basement!


Across the "aisle" from the finished soap and candles are these areas - from left to right are my essential oils (on the white shelves) and fragrance oils (in the totes below them); packaging supplies (jars, bottles, tubes, tins and bags) in the totes with the white lids and in the boxes on the top shelf; and the botanicals and additives in the jars on the unpainted shelving.  These shelves are shallow, but just the right depth for the large mason jars holding things like peppermint leaves, lavender buds, beeswax and other stuff.


Here's another shot of the additive "wall".  The stairs to the kitchen are just behind it, and the area under the stairs holds the boxes from things like printers and other equipment, because as sure as the sun rises in the east, if I recycle them, I'll have to send some piece of equipment back for repair and have to look around for a box to put it in!

And, yes, that is Mabel on top of the icebox.  She loves to sit on the chair and check out whatever it is I'm labelling at the moment.  She's good company.

Well, that's it for this post.  I hope I satisfied your curiosity about where I do my thing.  It's not a big space, nor is it shiny and new, but it's mine and it works.  :-)

Monday, May 10, 2010

First Craft Show of the Season.

Yesterday (Saturday) I attended my first craft show of the season, and the first one for me in Halifax.  Unfortunately it was not well attended, though this was through no fault of the organizers who worked their butts off to line up some great vendors with lovely products.  It rained hard later in the day, but for an event the day before Mother's Day, we were all scratching our heads wondering where all the shoppers were!  Despite that, I'm happy to have my name and my cards out in the Halifax area.  You never know when that little bit of presence may come back to you in the future.  Of course I promoted the Pictou County Weekend Market too, so people would know where to find my products and the products of other fine artisans through the summer - June 19th to September 19th.  Website is HERE.

Whatever the challenges of the day, it gave me a chance to try out a new display scheme and I think it worked well.

I had a corner spot, and because the tables were set up with me behind one leg of the L instead of being behind both of them, it gave me a different option to setting up my products.  I've been using two heavy folding bookshelves and I wanted to try something a little less cumbersome to set up.  So here it is.

This is the soap and B&B part of the display.  The tables are quite narrow, so there isn't a lot of room to spare, but I have 24 varieties of soap here.  Plus bath bombs (which are new this year) and a small display of lotion sticks, Night Time Foot Cream and Peppermint Foot Scrub.  I'm using black metal mesh letter trays from Staples and they fit 4 varieties of soap very well.  I also have matching black mesh sorting trays from the dollar store for things like the bath bombs.  I like that they fade into the black of the table covering so the soap and other things stand out.

Here's a closeup of one of the soap trays.  I've added labels for each of the varieties of soap too.  I still have a little work to do on them, but the general idea works pretty well.  The upper trays are sitting on the upended totes that I used to take the soap to the show.  As you can see, there is space between them to put other stuff too.


A little better view of the corner.  Not really enough space where the votives are to put anything else because it will hide the business cards, but on a larger table it might be more accessible.

Here are the candles facing the table with the soap.  I used a couple of step shelves that I got at Wal-Mart to make them easier to see.  I really wish I could get a few more of them, but the last few times I've looked for them I haven't seen them.


This is the end of the table.  The wax tarts and the tealights are in two of the dollar store mesh paper trays.  They work pretty well turned sideways so the candles don't slip out.


The far side of the candle table - Soy candles and wax votives on this side.  I had intended to only put out 6 boxes of votives, but decided to put the other two out as well.


And a closeup of the votives.  Two scents in each box; I tried to keep them complimentary, such as French Vanilla and Hot Fudge Brownie in one box, Northern Blueberry and Strawberry Rhubarb in another and so on.  I did remove the incorrect and leftover labels after I took the photo.  ;-)


All in all, I was pleased at how the display went together.  There are still some bugs to work out, but for the most part it was pretty smooth, especially tear down.  This weekend coming, I'll see how it works at the Farmers' Market.

Now I have to tidy my workshop and take pictures of that - that will be the subject of my next post.

See you then!

Potting Season is here!

It has been a busy spring!  We've gone from loafing around the house to working our tails off getting ready for our respective selling seasons.  I've been working in the basement on soap and candles and such, and Steve has been transforming the backyard into a plant nursery!  Because he is starting fresh, everything is getting done in the reverse order - ideally he'd be working in the greenhouse, then moving to the outdoor area, but the plants have to be potted up within a specific time frame, so that has to come first.

Here's what we started with - not much there:
This picture is from when I moved in - it doesn't show the shed I had built last summer.


Here is the back yard when things got going.  It's March 31 of this year - finally warm enough to start working outside.  And it's time to start potting up the root perennials that came from a Nova Scotia grower - things like hostas, astilbes, perennial geraniums, daylilies and lots more.  You can see supplies like bales of potting soil, pots, and pallets - Steve uses these to make raised tables to put the potted plants on.  The pallets allow the water to drain so the plants aren't sitting in too much water.  The pallets are used ones that the building centre is happy to give him.  :-)


The first pots are done - we started with the hostas; there are 4 different varieties.  The blue and pink sticks (plant names) in the pots are from old window mini blinds - nice way to recycle/reuse, eh?  :-D 


So here is the main view of the back forty on Day One.  You can see the lumber at the right that will be the frame for the greenhouse - when we actually get to it!   It's pretty bare, but it won't stay that way!


Fast forward a week to April 6th.  Lots more plants in pots and there are now tables for the pots to sit on - well some tables for some pots to sit on anyway! 


So here we are - tables on the right and the basic shape of the greenhouse laid out.


Here's the supply pile.  All the lumber in this pile is scrounged - from the same building centre where we purchased the lumber for the greenhouse (it's hard to find scrap 6"x6" pressure treated stuff  LOL) and where we get most of the discarded pallets.  There are some nice 4x4's for table legs and some good 2x4's and other stuff there.


 And here is a special plant - the only outside plant I 
brought with me from my old house.  It's the About Face Rose; the one I thought the deer had killed by eating all the buds off before they bloomed.  The one that didn't come up the year before I moved, but did the last summer I was in that house.  It got stuck in the ground at my new house (supposedly only temporarily) and apparently loves it where it is.  It's growing again - if you look closely you can see the leaves beginning to grow.  And yes, that is a strawberry plant beside it - left over from last year.


Another week or so goes by and here it is April 14th.  Lots more pots full, lots more tables built and work on the greenhouse is at least started.  But the plants come first!


You can see from this photo that the sills for the greenhouse are being placed.  And that there are now tables on both sides of the back yard.  Though I'm going to start calling it the back garden - it's much more than simply a "yard"!


A little better look at the sills and just how loooooong the row of tables is!
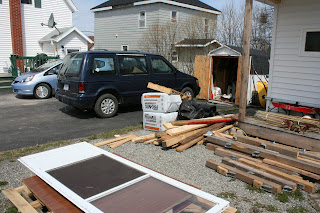


The supply pile is going down.  And, yes, that is an aluminum screen door for the greenhouse.  Traded for plants.


And we must have a picture of the gardener himself - though it's still pretty chilly, it's good to be working in the dirt again!


Another ten days goes by and more progress is made.  A generous friend needs her gardens (yes, multiple gardens) thinned out and Steve gets to keep a whole lot of those plants - lilies, evening primrose, columbine, creeping phlox and a lot more.  We actually have to make several trips to get all of it.  Then, of course, all the plants have to be potted up.


So now there are three rows of tables - and more to come.


Another week goes by and it's May 1st - May Day.  It doesn't feel very May like - still chilly and wet-ish.  But the work goes on.  Another row of tables and lots more plants.  It's lawn mowing time and our Plant Man has more plants from other clients to pot up.  Some we're not sure what they are, but he pots them up and we wait in anticipation for blooms so we can identify them.  Some of the plants we only have one or two of will go into the ground to provide for next year.


There are now 4 rows of tables and one started for inside the greenhouse.  That's a lotta plants!


Not all the plants are in the back garden.  The rose and strawberry (along with the sage, thyme, basil and rhubarb that you can't see) are in the little garden by the little barn.  Steve painted the dragon that guards them.  And those are weeds too.  Sigh.  My job.


It's May 2nd - Sunday.  And we made our first sale from the back garden!!! And then another one the next day!!!  Apparently word is getting around - we've been told that the town is buzzing about the new plant place where you can buy perennials - Whoo Hoo!!

These are the most recent pictures taken - on May 5th.  I'll take more soon, but you can see that we're still working away getting stock ready.  Soon the time will be past for potting for sale this year, and anything we put in pots after that will be for fall plants or for next season, or plants that we'll put in the ground to cultivate for next year. 


The table that was in the greenhouse area has been moved and a pallet has been put in its place, while the table is now filling up with pots.


The supplies are going down.  The last bale of soil has been opened, as has the last bale of peat moss.  There is one more bag of sheep manure and quite a few pots left.  We plan on accepting used plant pots to re-use, but until we get enough for a season, we've had to purchase new pots.  Listen to me!  "We", "Our" - LOLOLOL  You'd think I was the gardener!


 One of the gardens at the front of the house - tulips, crocus, hyacinth are up.  The little shrub is a spirea that we moved to this location last year when Steve put these gardens in for me.  The lights look really nice at night.


Here is the garden at the other side of the front stairs.  The pink hyacinth is in full bloom - pretty isn't it?


And another look at the About Face Rose and the little herb garden - complete with protective dragon.  Yes there are weeds, and yes the grass needs mowing, but that has to wait until the potting crunch has passed.  We thought we'd be able to take care of some of the lawn today, but it rained off and on all day.  Oh well.  It will get done eventually.


As always, if you click on a photo, it will open a much larger version.  Don't forget to click the back button to get back to the rest of the post!

Thanks for looking!