Wednesday, December 16, 2009

It's 9 days till Christmas and snowing...

Well! It's been a busy fall - finishing up at the Market, getting ready for Holiday shows and so on and so on. And a new housemate. All in a few months! WoW!. Getting ready for the Holidays has been fun - BF LOVES to decorate so he's loaded the house with lights outside and decorated the tree inside. It all looks fabulous! I took these pictures at dusk and I apologize that they aren't quite crystal clear, but I wasn't going to take a long time to play with the camera - it is COLD outside tonight!

This is the front of the house (duhhhhh!) showing the rose bushes lit too.


And the front straight on - note the candy canes!


And here is the lane side:


And the back:


And the Author of the pretty lights
Peeking out between the blinking lights -


And a little more in the open - and he hates having his picture taken. lol


As always, if you click on the images, a new window will open up with a larger picture.

I'd like to wish all my friends and family a very Merry Christmas and a Glorious New Year!

Wednesday, September 9, 2009

The Books Are In!

Just a reminder of what this room looked like previously:

http://millstreamcottage.blogspot.com/2009_01_01_archive.html

And when it was finished being painted etc.

http://millstreamcottage.blogspot.com/2009_07_01_archive.html

Boy what a DIFFERENCE!! Finally, finally, finally! The books are in the house...in the library specifically! Whoo Hoo!! Here are some pictures:


This is the view from the door. Three tall bookcases
on the left, a ladder style on the right as well as a half height bookcase on the right. And of course, my chair. :-D


Here is a better view of the long wall - you can see two of the three tall bookcases. Also the door to the "closet". (Not going to open that door just yet. That's next on my agenda. LOL)


Here is the view from the window - showing the bathroom door, the two bookcases on that wall and the last bookcase - the short one filled with National Geographics. Thanks Mom! :-D


A little closer look at the short bookcase here - Gabaldon on the top, Tolkien on the next two shelves (yes I'm a geek!) and various and sundry on the bottom.

Believe it or not, I really need another tall bookcase. I'll put the books on the ladder stand in it and the few that I can't fit anywhere else. ~sigh~

But they're all in one room for a change - Yay!!


One more look at the end opposite to the window with all three tall bookcases in the picture.

I haven't yet finished the "decorating" bit - I have some very special needlework to have framed, but I put up some things to make it look more finished.


I closed the roman shade and took one more picture - the curtains are teal green, but they have a distinct bronze-y shimmer to them that makes them perfect with the colour of the wall. In fact that's the reason I chose the colour paint that I did.


(BTW, if you click on the pictures you can see larger versions.)

Wednesday, July 22, 2009

Library room is painted!! Whoo Hoo!!!

Painting in my library is finished! Well almost - there are a few touch-ups of the trim that have to be done where I was a little bit sloppy and dripped a little of the wall colour on. But only a few. :-D

I put up my blind and the curtains and moved in one of my chairs to see how it looked - not bad. I also added an area rug I picked up at Canadian Tire tonight for 35.00. I think it looks ok - goes with the window treatments.

I won't have my bookcases until the end of the month, but I'm so glad the room is ready.

I'm doin' the happy dance tonight. :-D

Sooooooo...

Just to refresh your memory, here is what the room looked like before painting. The holes and cracks in the walls have been fixed and the holes in the woodwork have also been filled.


And here it is painted:


And with a little decorating:


And from the window looking the other way:


The trim is standard stuff - semi gloss latex enamel. The wall paint is FlexRock paint for walls and ceilings just rolled on with a standard roller in a suede finish. I really like the finish - it looks great! One thing though, I didn't prime paint because the can of FlexRock said it wasn't necessary. I will use the primer next time because as I was rolling the FlexRock on, it was lifting some of the fill compound right off. So the walls aren't as smooth as I'd like, but the finish is still very nice. I definitely will use this product again. It was a little more expensive than other paint, but I managed to do the whole room with one gallon and I think the result was worth the cost of the paint.

I can't wait to get my books in here!

Friday, July 17, 2009

I Have a Storage Shed!

Since I moved in September of 2008, I've been paying for a storage shed for all the stuff that wouldn't fit in my house. A lot of it is stuff belonging to the kids (who haven't any space for it, nor do they have a way to get it to them) that I've been keeping for them. That stuff has to be sorted by them when they come to visit (hint hint hint). Some stuff is books that will be going into the library when I get it finished (within the next week or so), and the rest is camping stuff and miscellaneous stuff that also has to be sorted and purged.

So... I had a shed built. Not only to hold all the "stuff" but for the possibility of being a small retail space some day down the road. That possibility dictated a few modifications over the plan of a simple storage shed, but I'm pleased with the result.

So here is the shed as it was being built:


I'll paint the deck floor and the posts dark green to match the deck and trim on the house. I'm also going to do some plantings and keep a gravel path walkway for now. The modifications I chose with a shop in mind are the deck/porch (which gives me more storage for boxes etc above it), two windows instead of one, and having both windows be thermal panes, and having both windows open.

I will still have to insulate (because it will get quite hot in there in summer and very cold in winter) and put up shelves to maximize the space, but I'm very happy with what I have now. I have one more load to bring from the storage unit and then I can tell them I'm done with it.

I'm a happy camper tonight!

Monday, June 8, 2009

Gardening

I've been working outside a bit when the weather cooperates. I've mown the lawn three times and cleaned up under the existing plantings. I've also replaced a shrub that was destroyed this past winter, planted a container (well partially planted it), a rose and some rhubarb. I have more to do, but here are some pictures of what it's like now.


This is the view from the parking area to the back of the lot. The tree line in the distance close to the white house is the end of my property. The tent is set up because Mabel decided sometime in the winter that I needed to be punished for something and peed on the tent bag and now it's being aired out. I think I'll leave it up for a while...


A container garden underway.


There are three plants here beside the driveway - two spreading juniper type, and the one closest to the back yard is perhaps some type of lily. I'm looking forward to seeing what grows out of the greenery. (It's hard to see because it is barely above the grass level and almost the same colour.)


The driveway from the front. I replaced the spreading juniper closest to the street - you can see it just beyond the lattice. The cedar in front of the porch is in bad shape, and the one matching on the other side of the house is dead, so I'll be replacing them, but I don't know with what yet.


You can see most of the front plantings in this view. I should have cropped the street from the picture. :-(


I don't know what the shrubs at the front (the yellow ones) are, but once they flower I'll be able to better search for them. You can see the dead cedar just to the left of the verandah.


This is the bleeding heart - or what's left of it. It was so congested with grass and weeds that it was quite weak to stand on its own. And the day after I cleaned it out we had a lovely, very windy day and more stalks were lost. But most of it survives and now it's supported well.


This Iris is such a lovely colour! It, too was clogged up with grass and weeds. Some of the rhizomes were rotten and I took them out, but there is still an area that looks like it is infected with something. More research to do.


The left rose bush is much smaller (as in fuller - both are the same height) than the other so maybe it is younger. The leaves are a lighter green which leads me to believe that these roses will be a light pink or cream. We'll see! The other is a much fuller rose bush - maybe it's been around a bit longer than the other. These roses will probably be a deep pink or red. It will be interesting to see what they turn out to be.


You can see where I've dug out a garden plot beside the shed. My rhubarb is there and so is About Face, and two of the hummingbird feeders are there too. I'm pretty sure the hummers have been around; in fact I think I was dive bombed while I was digging in the dirt there! (either that or it was a VERY big bee !!)


And here she is - About Face! She's growing!!! ^_^

A few other pictures of the trees and flowers:


Honeysuckle ( I think) on the side and Phlox and lilacs at the end of the property.


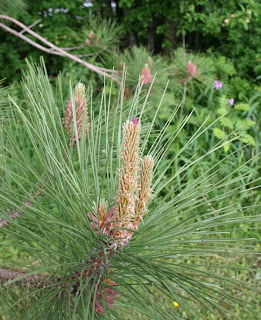
Some new growth on the pine tree at the end of the property - lots of this all over the tree.


These tall trees form a nice barrier of sorts so everyone has some privacy.


There is a lot of this stuff underneath the trees and I'm not familiar with it. the closest that I can come from looking in my reference book is Joe Pye weed. It's actually quite attractive - saw toothed leaves bordered in red with a fleshy red stem. I'm really looking forward to seeing flowers on this one.

Well, that's it for today. I have a few more things to plant - some thyme and basil and some strawberries...maybe.

note (in preview the text and photos are not lining up properly - I'll fix it eventually but I'm off to bed now.)

Monday, April 13, 2009

Making progress

Progress is being made! Sloooooowly, though. April is such a busy month and there is a lot to do - getting ready for markets, income tax (ugh!), a training course meeting is coming up, and of course trying to keep up with the changes in the weather.

However, in and around all that, I've got half the room walls crack filled, half the moulding sanded and the holes filled and the wherewithal to do the rest. I also have the window treatments ready to go up, but they don't go up until the last thing. The switch plates and outlet covers are ready too - all I have to do now is get it done. I have a plan in my head as to what goes where (bookcases, chairs, stereo etc.), so that's a good thing! And today I bought the paint for the walls. Whoo Hoo!! I even bought one of those zippered plastic doorways to try to keep the bulk of the dust out of my bedroom and the spare room (which will be tackled after the library is done). We'll see how well that works!

Now, however, I have heel balm to make, so the work in the library will have to wait for another day.

Thursday, March 19, 2009

Finally - Clean walls!


The wallpaper is gone and the walls have been washed clean of dirt and old wallpaper paste. I didn't find any more "surprises" like the outlet I found last time, but the area around the working outlet on the outside wall needs some repair, so that will be on my do first list. I also found evidence that there had been some repair way back when, because under the three layers of paper and one of paint, there are actual plaster repairs. And in one corner I found evidence of yet another layer of wallpaper - must have been the original stuff.


And I finally found out when my house was built - 1946 - so it's 63 years old, not 70+. Typical post-war house for this area I suspect.

As I thought, the walls need a fair amount of repair and I'm all geared up with plaster and drywall mud, drywall tape and sandpaper. Now I suppose I'll have to get to it! LOL

More to come!

Tuesday, February 24, 2009


Back at the wallpaper stripping!

I finished the wall where the hall door is - lots more cracks and so on - nothing that I didn't expect. However there was a bit of a surprise in the shape of a square "hole" in the area of the old chimney. I think it must have been a clean out or something. For some reason it wasn't closed off very well and the "hole" looks almost like a bowl on its side.

Here's a close-up:


The green wall in the photo following was easy - it's drywall with one coat of paint and the vinyl wallpaper over that. What a change from the plaster and the two additional layers of old wallpaper!


There was another surprise too. I had noticed an area on the far wall (to the right of the window) where it appeared there was another "hole" under the wallpaper but I couldn't imagine what it would be for. No chimney there, no cable outlet - no nothing! Imagine my surprise when I uncovered this:


I have an electrician friend and I'm going to see if he can remove that thing for me. Goodness knows how old it is.

I've also been replacing the hardware on the cupboards in the kitchen. I will be painting there too, but the painted over handles were really annoying me so I've replaced them. You can see the paint on the gold toned handles ...


I've also replaced some of the hinges (more to go) and here are pictures of the before and after:


That's it for now. More to come in the days ahead. :-)